Internal Soundcard
PCI-based, internal soundcard can be installed inside both windows and mac computers while being discreet.
M-Audio Audiophile 2496 - $100
http://www.zzounds.com/item--MDOAP2496

The Audiophile 2496 has become a very popular choice with its high-quality 24-bit/96kHz resolution and because M-Audio has now teamed up with Digidesign to offer an M-Audio version of Pro Tools. Pro Tools M-Powered is a cheaper version of the industry-standard software and buying the Audiophile at $100 is much cheaper than getting a Digidesign M-Box at around $500. At a small size, the Audiophile now packs the punch of larger units of the past.
(Note: to record with a condensor mic, you will need a pre-amplifier.)
Microphone Pre-Amplifiers
This is the most important component when gauging quality. Pre-Amps are what makes your mic sound full and clear
PreSonus Studio Channel Tube Microphone Preamp - $300
http://www.zzounds.com/item--PRSSTUDIOCHANNEL
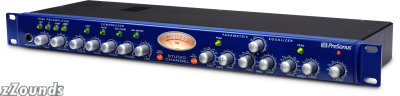 This is the budget pick for a decent pre-amp. It features a class A vacuum tube which is what you need to look for in pre-amps. The vacuum tube gives natural warmth which vocals and instruments that full, crisp sound. Focusrite also makes good pre-amps, but PreSonus gives more value. This only setback is that the unit doesn’t feature S/PDIF on the stock version, but it has a slot in the back if you want to upgrade to digital. The PreSonus has XLR and 1/4in. analog connections.
Avalon VT-737SP Class A Mic Processor - $2,250
http://www.zzounds.com/item--AVAVT737SP
 Avalon is the “big kahuna” brand when it comes to pre-amplifiers. It’s vacuum tube makes industry quality sound easy to achieve. You can plug a regular $100 mic up to this and make it sound like a $2000 Neumann! This pre-amp also has built in compression and EQ for advanced users. Anything coming in from an Avalon sounds full and as warm as you can get. Plus, you can hook up your guitar or other amped instruments and route it back to the mix via S/PDIF for superior quality. If you can afford it, this beast will make you sound pro in no time.
 Audio Interfaces:
Audio interfaces are a very popular solution to a home studio since it combines a soundcard with a pre-amplifier. Having two in one makes workflow easier and enhances portability.
USB OPTION: M-Audio Fast Track Pro USB Audio Interface - $200
http://www.zzounds.com/item--MDOFTRACKPRO
 This low-budget USB interface has the 24-bit/96kHz quality and the S/PDIF (Digital Audio) inputs and outputs usually featured in more expensive interfaces. S/PDIF is a new technology that is getting more popular due to it’s clean, all-digital sound. The Fast Track Pro is also compatible with “Digidesign Pro Tools M-Powered” which is the poor man’s version of Pro Tools and handles very comparably to the original Pro Tools. Also being powered by USB makes a power cord obsolete and maximizes portability. Now with compatibility with DigiDesign Pro Tools, M-Audio products are turning as many heads as ever.
Firewire Option: Focusrite Saffire - $300
http://www.zzounds.com/item--FOCSAFFIRE
 For those of you who have a firewire-ready computer, a firewire interface is the way to go. Firewire is the format of the future because the data stream goes both ways while USB is limited to one-way transfer. The quality is up to 24-bit and a stifling 192kHz which is much more than needed. The Saffire has more inputs and outputs than most musicians need and features Focusrite pre-amps which are known to be the best of the best. The main selling point of the Saffire is the DSP feature which uses non-destructive hardware-based effects. The effects are adjust in the software, but applied in the soundcard itself and can be changed unlike conventional hardware effects. Having controllable hardware effects achieves good sound without taxing your CPU. The Saffire also has S/PDIF and the headphone jacks up front make live monitoring easy in a recording session. This is what I own and it’s the way to go if you are serious about your studio and have a decent budget to work with.
Microphones
The most common miconception about recording is “the better the mic, the better the sound.” I’ve personally heard the difference between a $100 mic and a $1200 mic on the same pre-amp and noticed no increase in clarity or warmth.
Audio Technica AT2020 Studio Microphone - $100
http://www.zzounds.com/item--AUTAT2020
 This is the $100 mic that performed comparably to a $1200 Neumann. Both were plugged into the “big kahuna” Avalon and both achieved crisp vocals. Condensor mics perform much better than dynamics and this is the best $100 mic i've heard. The Behringer B-1 is decent also decent. It really depends on the pre-amp and the compression and EQ you put on the vocals.
Neumann TLM103 Studio Microphone - $1200
http://www.zzounds.com/item--NEUTLM103
 Like I said, I audibly didn’t hear the difference between this mic and the Audio Technica, but I know that industry vets praise Neumann mics. The Neumann has a better range and gives professional engineers more to work with. I’d advise this mic to only pure professionals who have spacious pockets. I would much rather spend $1000 on a better pre-amp than a mic.
Studio Monitors
Mackie MR8 2-Way Active Studio Monitor (1x8 in.) - $500/pair
http://www.zzounds.com/item--MACMR8
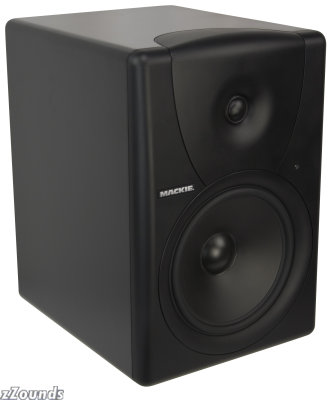
These are the TRUTH! I got these and they give you an accurate picture of what you are mixing. It’s hard to mix on sub-par speakers because it’s hard to tell between a slightly muddy mix and an industry track. After listening to these, everything else sounds muffled! Monitors are always better than headphones especially when mixing bass. Industry vets were drooling over these at the recent audio expo and I got them a bit cheaper at Guitar Center. BTW be careful because these are sooooo loud. I only have them turned up 40% on the back and they can still get me complaints in my apartment complex!
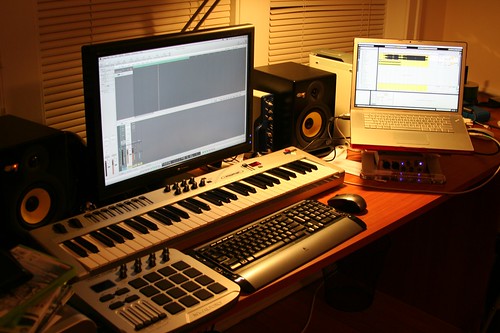
MY STUDIO

MACKIE MR-8'S - $500
AXIOM 49 USB CONTROLLER - $200
STUDIO PROJECTS B-1 CONDENSOR MIC - $200
FOCUSRITE SAFFIRE - $300
WALMART BED FOAM - $10
METAL POP FILTER - $20
FOR MORE GUIDANCE HEAD DOWN TO GUITAR CENTER!!! THEY ARE USUALLY ON-POINT AND THAT'S WHAT THEY ARE THERE FOR!!